Horizontal vs Vertical Murphy Bed: Which Fits Your Room?
A lower cabinet can take more wall width; a narrower cabinet can project farther into the room. Compare both Murphy bed orientations with the bed open.
Table of contents
Understand what changes when the bed turns sidewaysUse actual product dimensions and resolve conflicting figuresCompare two orientations in exactly the same roomCheck how people will enter, sleep, and leaveConfirm the wall, mattress, and installation conditionsBuild a measurement packet before placing the order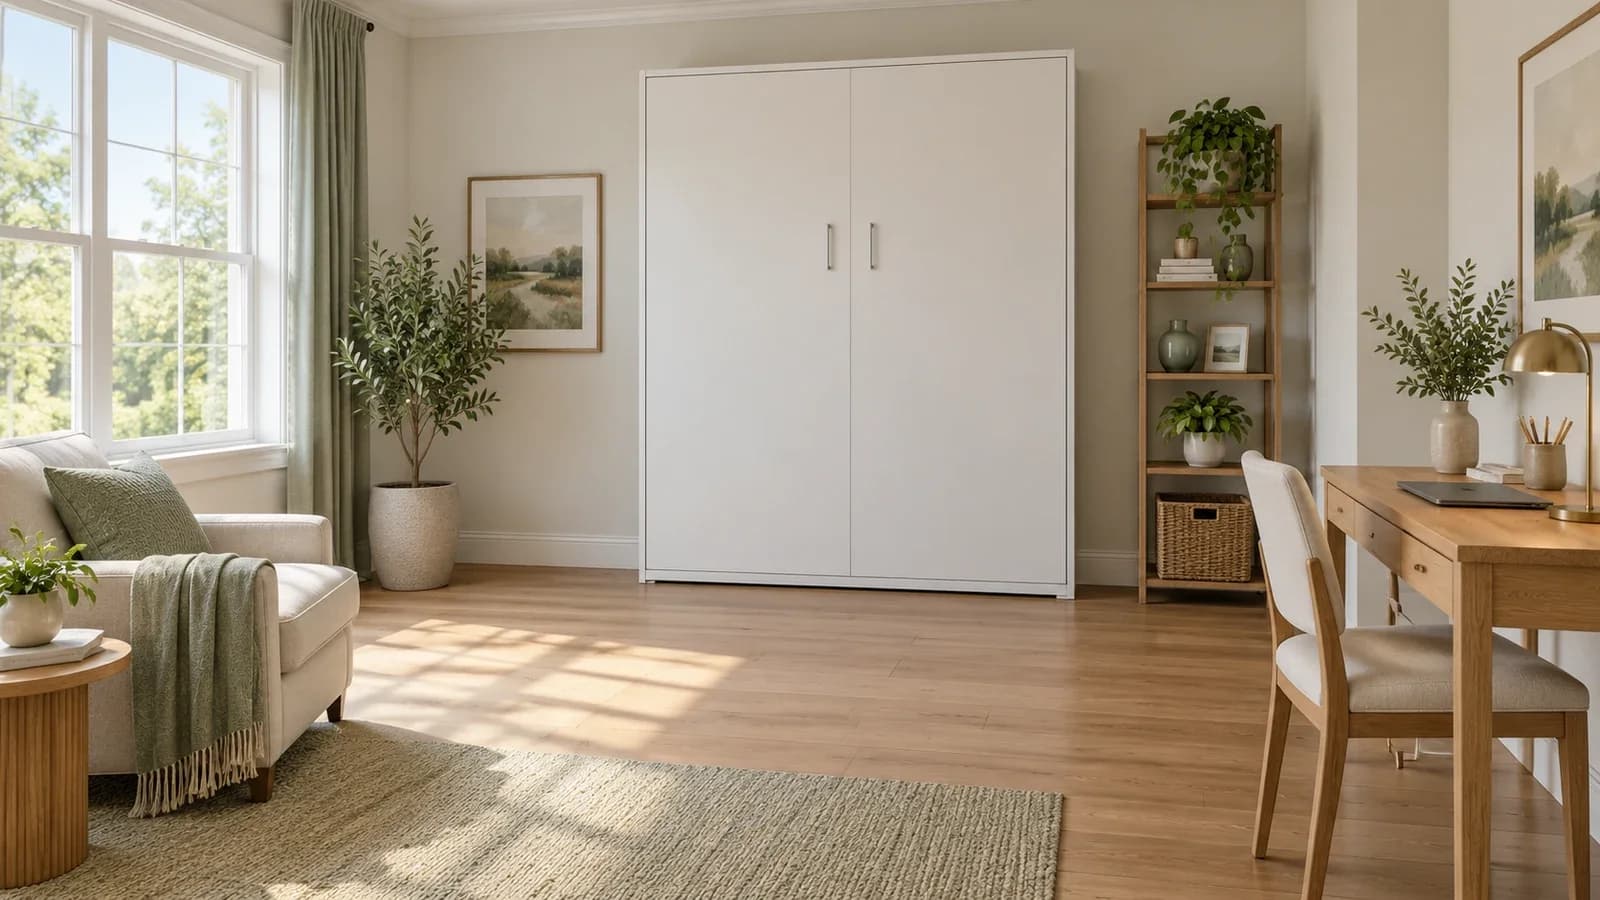
A horizontal Murphy bed usually needs a wider section of wall and projects less deeply into the room, while a vertical model uses a taller, narrower cabinet and extends farther outward. The better choice depends on the complete open layout: doors, nearby furniture, access to the mattress, and the manufacturer’s required clearances. Compare exact models of the same mattress size before deciding which orientation fits.
Understand what changes when the bed turns sideways
A vertical wall bed folds down with the head near the cabinet and the foot extending into the room. A horizontal wall bed folds along its long side, so the mattress length runs parallel to the wall. Neither orientation makes the sleeping surface smaller. It changes where that surface and its cabinet occupy space.
Horizontal cabinets can be useful where height is limited but a long uninterrupted wall is available. Vertical cabinets may leave more wall width for other furniture, provided there is enough ceiling height and open floor depth. These are tendencies, not model specifications. Shelving towers, trim, handles, and integrated desks can change the overall dimensions substantially.
A cabinet’s closed depth is only one of the measurements you need. The fully open footprint includes the bed and supporting parts projecting from the wall. The movement between closed and open can require additional clearance. Add the operating area and access routes around that footprint rather than treating the outermost edge of the mattress as the end of the planning exercise.
Use actual product dimensions and resolve conflicting figures
The following examples were checked on Bestar’s US product pages on October 24, 2026. Both accept Queen-size mattresses, but they are different collections and mechanisms. Cabinet dimensions below come from the selected models’ dimension images; the product pages also display rounded summary values. Use the current model instructions for a purchase decision.
| Selected model | Cabinet width × height × closed depth | Fully open depth and confirmation needed |
|---|---|---|
| Bestar Claremont horizontal, 122186-000071 | About 84.4 × 64.2 × 19.5 inches in the dimension image | Description: 69.43 inches from the back; dimension image: 70.2 inches overall. Confirm the discrepancy and required operating clearances. |
| Bestar Pur vertical Queen, 26184-17 | About 64.6 × 87.9 × 20.3 inches in the dimension image | Description: 92 inches from the wall. It also specifies a 91.1-inch minimum ceiling and 30–36 inches around the open bed. |
The Claremont discrepancy is a reason to ask for a current confirmed drawing. Do not choose the smaller number because it makes your floor plan work. Check that the seller’s answer identifies the model, measurement reference, and relevant revision. A product title such as “85W” is not a substitute for its detailed dimensions.
Cabinet height and minimum installation ceiling height are also different numbers. The Pur example’s listed minimum ceiling is higher than its cabinet. Measure the lowest relevant ceiling point, including a soffit or sloped section, and ask about assembly clearance. A cabinet that fits upright may still need more space while it is assembled and secured.
Compare two orientations in exactly the same room
The two plans below are an original planning exercise, separate from the product examples. Both use a room 12 feet wide by 10 feet deep with an 8-foot ceiling, a 32-inch inward-opening door at the lower left, and a centered 48-by-24-inch desk against the opposite wall. The furniture and door remain in the same positions so the effect of changing the bed is visible.
For the horizontal option, assume an 85-inch-wide, 65-inch-high cabinet that is 20 inches deep when closed, with a total open projection of 71 inches. For the vertical option, assume a 65-inch-wide, 88-inch-high cabinet that is 21 inches deep when closed, with a total open projection of 92 inches. These hypothetical dimensions are not approved specifications for either Bestar model.
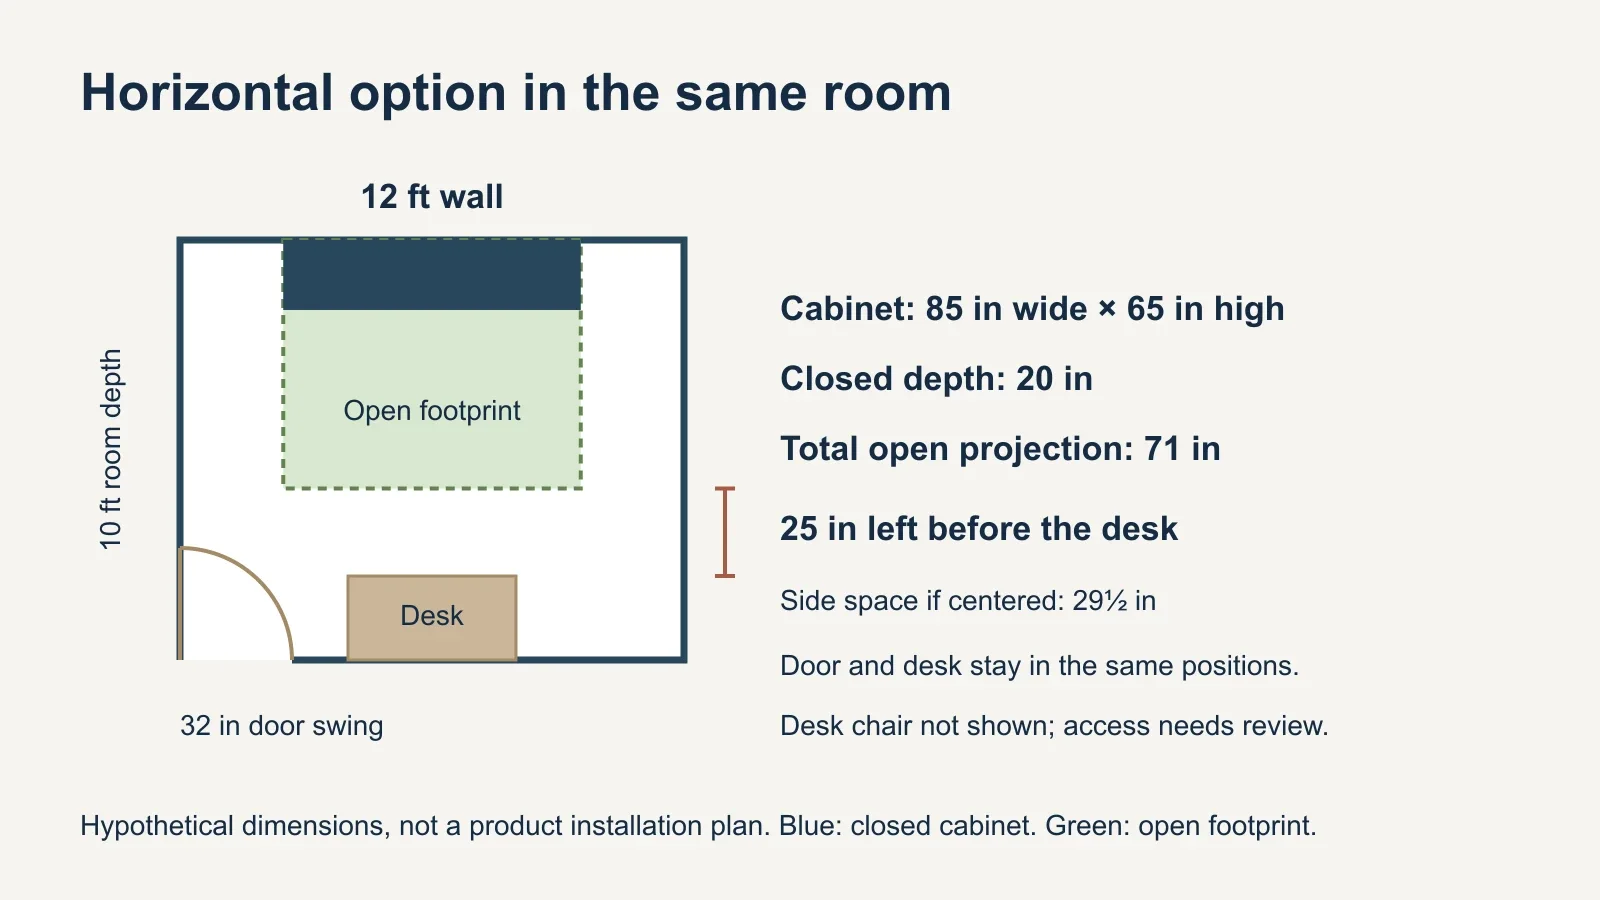
In the horizontal example, 120 inches of room depth minus the 71-inch open projection leaves 49 inches to the opposite wall. The 24-inch-deep desk reduces that to 25 inches. The centered 85-inch cabinet leaves (144 − 85) ÷ 2 = 29½ inches on each side. That gives you specific areas to compare with the chosen model’s requirements and your own access needs.
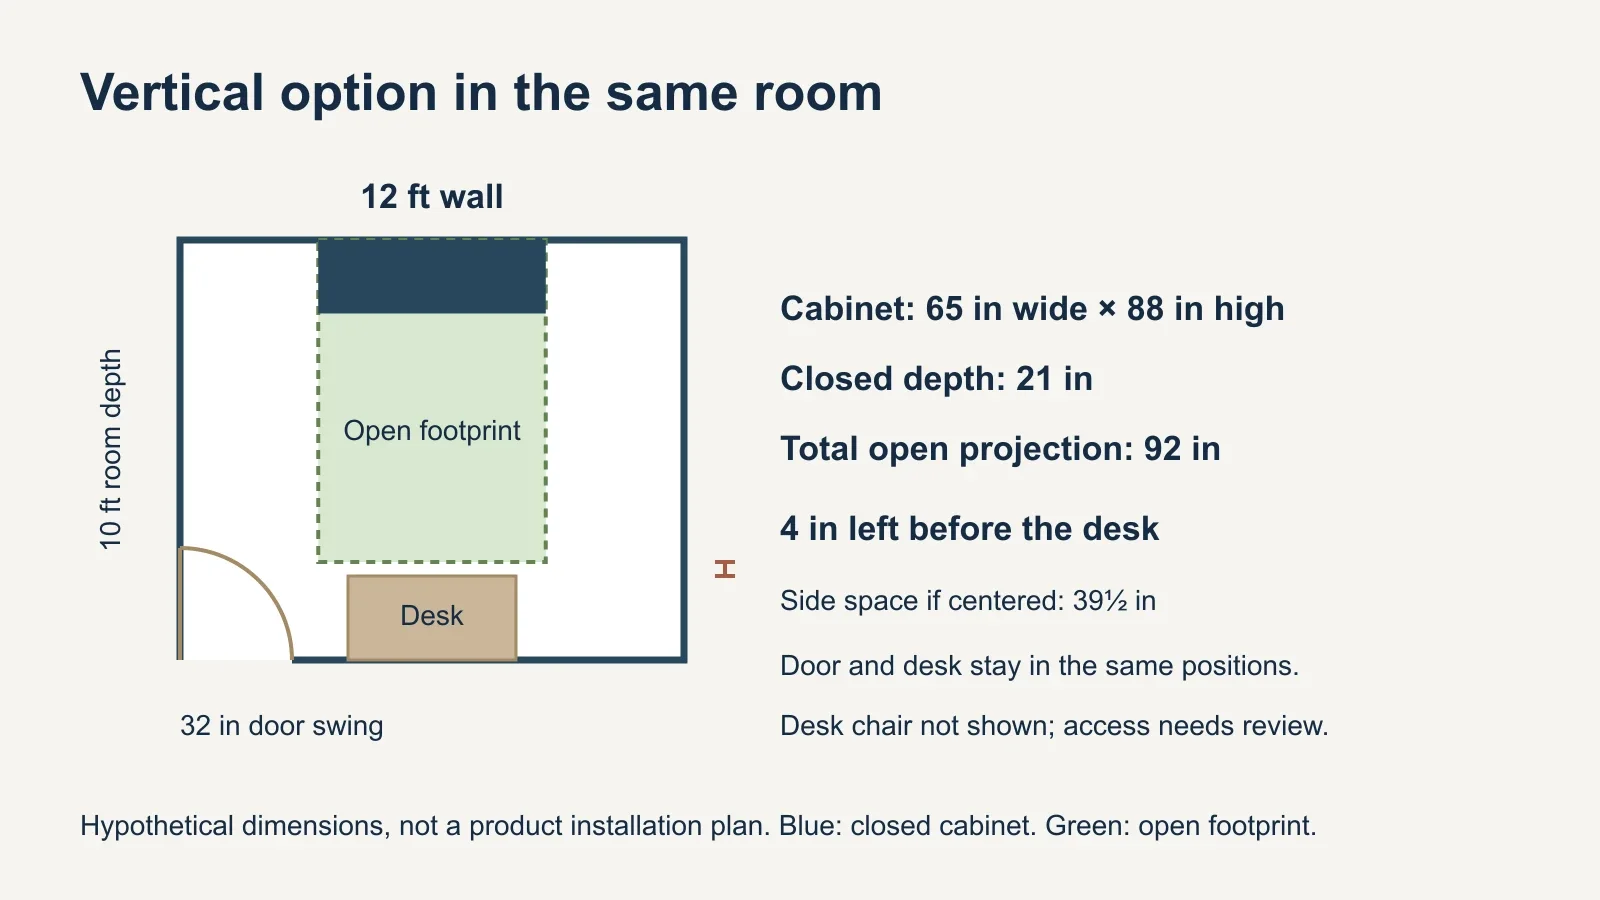
The vertical example leaves 28 inches between the bed’s outer edge and the opposite wall, then only 4 inches once the desk is included. That is an obvious access problem. Its larger side spaces do not make the foot area usable. Removing or relocating the desk would change the result, which is why measuring an empty room can be misleading.
These sketches do not approve either arrangement. The horizontal option still needs clearance verification, and the desk chair is not shown. A chair left pulled out would reduce the available space further. The door arc is shown so its complete swing can be compared with the bed and furniture; also trace an unobstructed route from the doorway to the sleeping area.
Check how people will enter, sleep, and leave
Think about who uses the bed and how often. A horizontal layout places a long side near the cabinet; access to the wall-side sleeping position can differ from access to a vertical bed. Check how each person will get in and out and how you will make the bed. A layout that works for an occasional solo guest may be awkward for two people using it every night.
Treat the bedroom door, closet doors, and furniture drawers as moving objects. Draw their swings or extensions on the same plan as the open bed. Check them both while the bed is fully lowered and during its movement. A closet that opens only with the bed stored may be a tradeoff you accept, but the room’s required exit route must remain usable.
Keep fixed obstacles on the drawing: radiators, vents, projecting window sills, wall lights, and shelves. Show nearby outlets and plan cords so the bed cannot trap them. A movable ottoman is different from an anchored cabinet, yet moving several heavy items every night may make the arrangement impractical. List what must move each time before deciding the room is ready.
Confirm the wall, mattress, and installation conditions
Space planning cannot establish whether the installation surface is suitable. Have the intended wall and floor assessed against the selected bed’s instructions before purchase. The two Bestar examples require attachment to wall and floor structure by a professional or qualified person. This is a product-specific installation requirement; a visually suitable wall is not enough to confirm anchoring.
Check the mattress requirements along with the cabinet. Thickness and weight affect whether the bed closes and how its mechanism operates. The Claremont example specifies an 8–10-inch-thick Queen mattress weighing 35–70 pounds; the Pur Queen example lists 8–12 inches and 60–90 pounds. Do not carry one model’s limits over to the other.
Also confirm that the mattress manufacturer permits the intended wall-bed storage and support arrangement. A mattress that physically fits the cabinet is not automatically suitable for being stored vertically or on the supplied support. Include bedding and any permitted accessories in your closing-clearance discussion rather than assuming everything can stay on the bed.
This comparison is about selecting a layout. Our Murphy bed installation cost guide covers the separate budgeting question. When assessing a quote, provide the actual model and room conditions so the installation scope can be evaluated for the bed you intend to use.
Build a measurement packet before placing the order
- Draw the room’s measured width and depth, including doors, windows, fixed obstacles, and ceiling restrictions.
- Record the exact bed model and size, full cabinet dimensions, open projection, and minimum installation ceiling height.
- Overlay the open footprint, the movement clearance, and the operating/access space required by the instructions.
- Add all adjacent furniture, drawer extensions, door swings, and the desk chair in its normal position.
- Confirm wall/floor installation suitability and mattress size, thickness, weight, and storage compatibility.
- Resolve inconsistent or missing dimensions with the manufacturer before ordering.
- Plan delivery access and a separate area for unpacking, assembly, and anchoring.
Tape the confirmed footprint and clearance zones on the floor using a finish-safe method. Walk the nighttime route and try the door and nearby furniture. Use the exercise to find conflicts, not to certify an installation: height, structure, and moving geometry still need their own checks. Our assembly-space guide helps you plan the temporary work area as well.
When requesting furniture assembly assistance, share the model, current instructions, room plan, and wall/floor details. Confirm that the scope covers the specific wall-bed installation requirements. Choose the orientation after the complete layout has been checked, so the room remains useful both during the day and when the bed is down.